Historical references for copper roofing

While I was searching the Building Technology Heritage Library for a duty-free copy of Neubecker, I came across a new resource (to me).

The Anaconda Copper Mining Company, part of the Amalgamated Copper Company from 1899 to 1915,[1] was an American mining company. It was one of the largest trusts of the early 20th century and one of the largest mining companies in the world for much of the 20th century.[1]

https://en.wikipedia.org/wiki/Anaconda_Copper

The specs here are for 10oz copper, what they call “economy” roofing. I assume from the title, the marketing, and the specs it was offered less to promote permanent roofing, and more to sell copper. We would never use 10oz copper for a roof.

Right away, we are treated to incomplete information, and oversimplification… showing transverse seams. It gets worse on the next page…

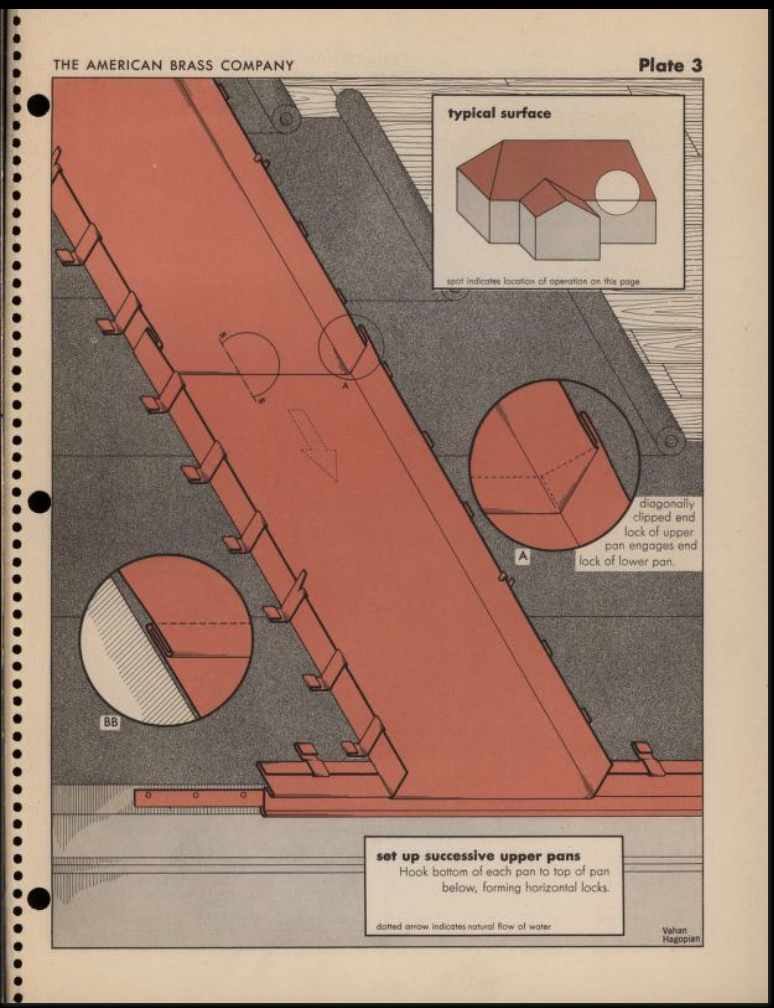
Fixed clips can only be used on short rafters. (less than 28′). When you join the pans together with the field seam it creates columnar strength that essentially makes it a single pan. This is the hard lesson learned by those in europe who were tasked with replacing their own failing designs. The roof works against the fixed clips and eventually works them out, causing a wholesale failure over about 200 years. While this would be a decent life-cycle for most, we are striving for better and we now have the knowledge to do better. A general rule of thumb: if you are creating a copper roof that needs more than 2 10′ pans, incorporate expansion clips. Further: the roof needs a fixed point in the middle, for low pitches, and higher up the roof depending on pitch. This is to account for “critical loading” where the weight of the roof itself starts to bear on the clips and fasteners as the pitch increases. For a steep roof: the fixed clips are placed almost near the top, with expansion clips below.

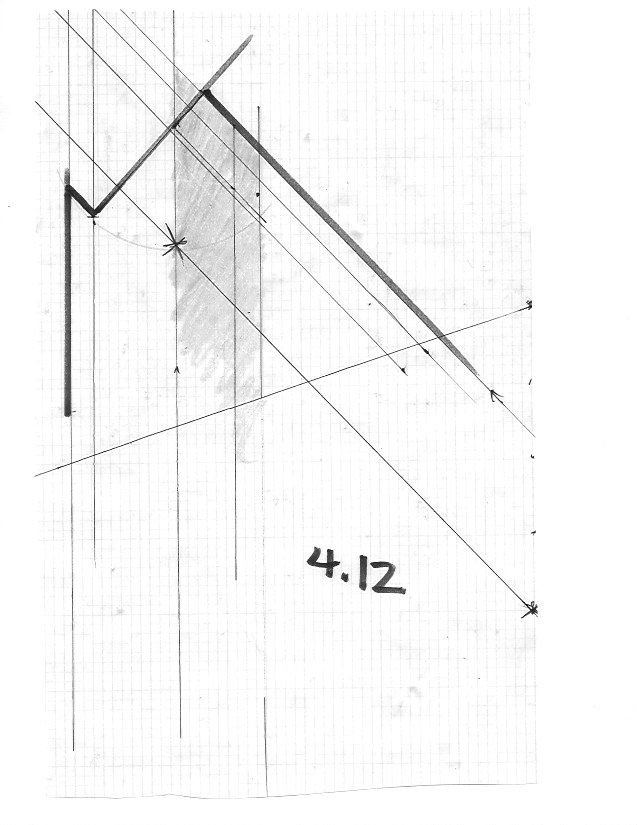
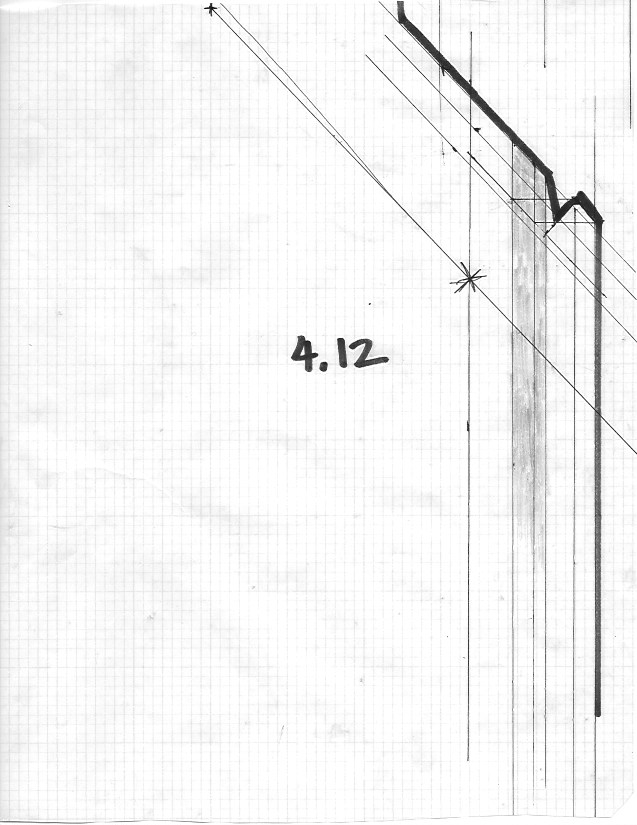
So what’s wrong with this? Several things: the rules dictating the use of transverse seams are completely reliant on the pitch, and overflow/backflow conditions. Further they don’t demonstrate what the rules are for creating the notch. This is covered with more clarity in a modern resource:

Single lock, only acceptable for pitches above 4:12
Double lock, acceptable for pitches from 3:12 to 1:12

Even with these rules of thumb, it’s important to realize other factors can determine the use of a wide-notch transverse seam at low pitch.. It can only be used in un-obstructed field where there is no risk of overflow.


A few pages later, we see some very simple hip “instructions” showing dead-cut full seams with no notching. It was possible to fold a light-gauge steel roof with no notching to the pattern, but it’s not recommended. Anyone who has attempted to fold 6-8 layers in copper knows this.

they “almost” have it.

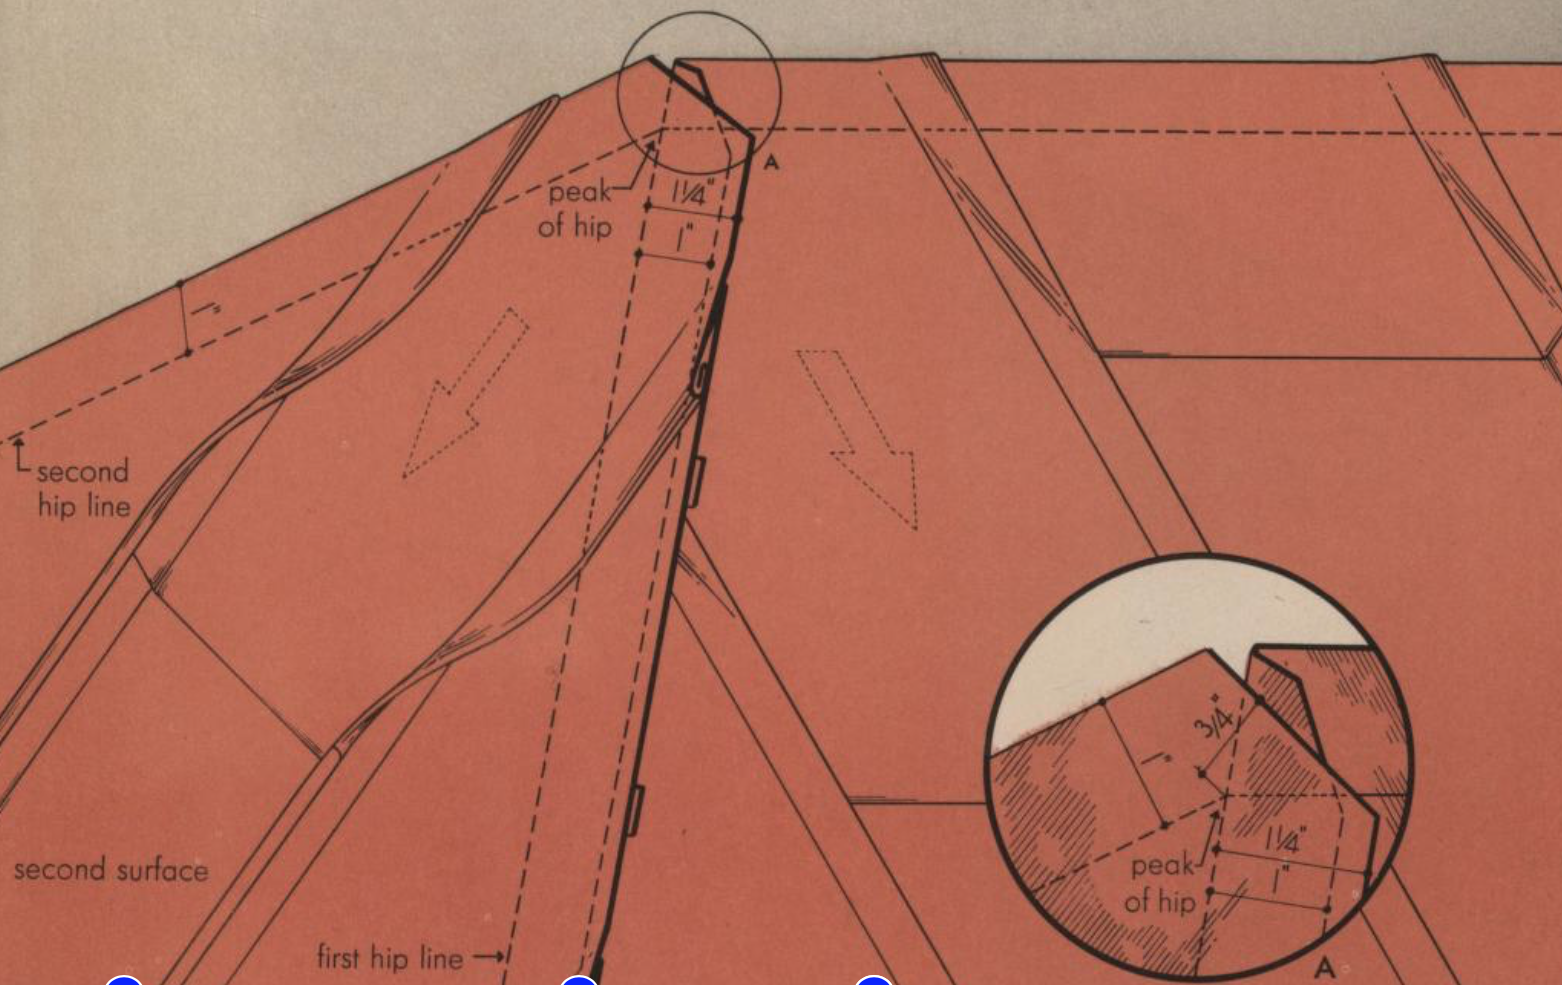
While I was excited to see a reference showing the actual folding of hips and ridges, this ultimately does not help the installer create a permanent assembly as it could be with the proper planning, and care to joinery. It is better than Neubecker’s treatment of standing seam, but only gets us about halfway there.

This goes to demonstrate the main issue with knowledge of metal roofing in America. We assume that historically: they knew what they were doing but our references compared to similar work and knowledge from the old world shows this is not the case.

Throwback: Comparing real slating vs. “industry” work๏ปฟ

Posted 24th February 2009 by Kurtis

This is what a valley is supposed to look like.  Each course runs all the way to the exposure line and you shouldn’t see any of the next slate hanging down.  If your valley cut is wider than a normal bond you use a slate that is larger than the rest of the field slates to run all the way in.

This is what field should look like.  Slates are laying flat, the bottom of the slate shouldn’t be canted up in the air.  Gaps at the bottoms of the slates like those shown in the photo below are usually a sign of over-nailing, poor decking preparation, or lack of a cant strip at the bottom.

This picture shows a job where Commonwealth Roofing, from Louisville, KY stripped a perfectly good peach bottom roof from this house and laid new slate.  There was some damage to the box gutters and a dormer from a tree fall, but it only required replacement of the copper work and a few courses of slate.  I’m sure they convinced the homeowner or the insurance company that the whole thing needed to be re-done.  I guess that would have been OK, but the work they did is terrible.  This is a “new” roof.  It is only a few months old.  Notice all of the slates that are not laying flush and the inconsistent exposures everywhere.  Also they didn’t run each course all the way into the valley.

More of the same junk. ย These are not even the worst areas of this roof.

View comments

  1. jimmy March 8, 2009 at 12:21 AMI don’t even know what I’m looking at and the old stuff looks like total shit to me. I could never leave a job looking like that. I don’t know if I’m too anal or what, but I just don’t understand how people do work for others that isn’t 100%. Where’s the pride..
  2. Kurt March 8, 2009 at 10:31 AMJimmy the terrible-looking roof isn’t old. It was just finished this week by a local roofing company who advertises slate work. The word is greed. They convinced the homeowner or the insurance company that the whole thing needed to be re-roofed when really it just needed minor repairs. The original roof was better than what they got, even with the storm damage.
  3. Anonymous March 9, 2009 at 4:05 PMOf course – the real question is: who is the lucky homeowner for the 1st set of pictures? Those are georgous!Reply
  4. Kurt May 4, 2009 at 7:43 PMThe 1st set of pictures is a client’s house that we installed a new slate roof on.

Throwback: Design slam

Posted 5th September 2008 by Kurt๏ปฟ

Traditional vs. Traditional “looking”

Here is a good real-life example of traditional design intentions being executed poorly. This new house is infill on a street of mostly antebellum houses. It looks like it was constructed well using good materials by today’s standards. But they screwed up the proportions and some details which make the whole thing feel inauthentic. First: the pop-out in the center with the gable roof makes this a single oversized bay with symmetrical 2-bay wings. It puts too much emphasis on the center, making the other parts feel less significant. The large “paladian” window on the second floor is almost as big as the whole entryway on the first. It is poorly massed. A better configuration would have been a standard symmetrical 5-bay configuration with a single gable roof plan. This would be in character with most of the other houses on the street which are 3 or 5 bay with single gable. I know a stone foundation is not really cost effective for most building projects these days, but they should not have raised the foundation as high as it is. This is out of character with every structure around it. The oversized brick stoop is also too much.
Now the details: The large window casings are out of place on a brick structure. The windows should have a simple lintel and sill of stone or brick if stone is not in the budget. Considering the expense involved to produce those custom casings, they probably could have afforded limestone lintels and sills instead. And finally the cornice: the entablature is massed properly, but they used a tiny cyma molding in place of a bed mold, and again a tiny cyma where the crown should be about double the size of what it is. 

Compared to a traditional building:

Important characteristics to note on the traditional plan:
Size of the windows suggest hierarchy; the first floor is emphasized. The stoop is simple and understated. There is almost no setback, making the home contribute directly to the public space. There is no gratuitous trim or ornamentation, not even a cornice. The overhang is accomplished with corbeled brick.

Postedย 5th September 2008ย byย Kurt

“The big book of the roofer on metal”

Translated by google from: http://www.krovlirussia.ru/book/texnika-dvojnogo-falca

The author is a Hungarian roofing engineer, Laszlo A. Santo. The owner of his own roofing company, who educated more than a dozen master roofers.

In his book, the author, relying on his forty-year professional experience, after ten years of computer development on the topic, offers the readers attention to the basic nodal connections of traditional roofing works on metal, carried out in digital form and put into practice. In the four-volume edition you will be able to get acquainted with the key connections of the work carried out, the prescriptions of professional rules and practical experience, supplemented by a collection of instructions, lectures and articles. 
Each volume is devoted to a separate topic, but they are all closely interrelated. This edition will be interesting, of course, to roofers, architects, designers and other market participants, working with both metal and small-piece roofing.

Content:

Volume 1. Roof water discharge, linear coatings, structures

  • Suspended roof gutters and gutters 7 – 65
  • Eaves and hidden, recessed gutters 66 – 160
  • Covering walls, overhangs for soft roofs and parapet gutters 160-210
  • Protruding designs and decorative details of the roof 210-300

Volume 2. Metal parts for roofs from small-piece materials / elements

  • Elements of cornices and gables 7 – 101
  • Elements of wall contiguity and gouge 102 – 193
  • Elements framing roofing openings 194 – 287
  • Definition of terms and designations 288 – 300

Volume 3. Seam cover

  • Eaves 7 – 95
  • Elements of wall contiguity and gouge 96 – 162
  • End strips and ridge roofing elements 163 – 240
  • Roof openings 241 – 333

Volume 4. Rack and rebate cover

  • Rack seam and cascade roofing 7 – 116
  • Facade coatings 117 – 225
  • Facing facades 226 – 287
  • Definition of terms and designations 288 – 300

The cost of the book is 12,500 rubles.

Universal Sheet Metal Pattern Cutter, VOL2

“Surface development” or “surface pattern making” is the process of creating a 2d pattern for any shape that will be formed out of sheet material to create a 3d assembly.

The skills of surface development pattern making are important for decorative sheet metal, historic preservation, metal roofing, and copper work. Learning how to develop a pattern for any shape you would like to create can be useful for larger architectural forms as well.

One of the techniques used in pattern making is called “parallel line development”. This skill is vital for creating notching patterns for standing seam roofs.

The book, along with many other primary sources are hosted at The APT Library at the internet archive.

Spengler TV

Spengler is the official trade name in Germany (and maybe some other countries) for metal roofing. I’ve watched this channel grow up on Youtube, and wow they have added a lot of content! Metal roofing and standing seam, are codified by law there. This means everything last longer, there are fewer repair and maintenance cost. And on the market side: it means everyone has to play by the same rules, much like a bar or medical association. They study and master the techniques in secondary school. This is miles above “on the job” training, or even union training here in the US. Since union training is still focused more on meeting the “market” production demands.

Seaming a pipe stack to a long-pan metal roof. Skip to 5:00 to see the action!

ะšะ˜ะฏะะšะ

This forum, on FB is absolutely one of the best sources for information and example photos for permanent, standing seam roofing. We rely on the translator service as almost nobody speaks english. Back in 2012, when I was studying folding and joinery techniques (with zero online resources in english) I used to pull the text one-by-one from PHP forums and paste into google translate. This is so much better as we can actually communicate; although it is somewhat broken.

This photo shows a really interesting valley concept, and the debate ensues… What is so unique and showy about this approach is that one whole side of the field had to be installed, and turned up. When the opposing side was installed: since the seams have to run in to and past the valley, it means they had to deform every field seam down, and lay them all over all the way up, so the pans would sit flush on the field. This is working blind. After that, they would have to close all of the connecting seams, and dress it down to fold the valley.

A member, posted a detail which is similar but with a batten-cap, and square seam

Kevin finished the diamond turtle! FB folders rejoice.

Great project from New Jersey metal master and tradroofing.com student: https://www.facebook.com/kevin.rosselli.39

Kevin, musing on the inevitability of the next roofing crew causing damage to this, which can and should last the lifetime of the building. It brought to mind, one of my early works that was later destroyed by an eager insurance claims industry. Ready to sell work that was un-needed because of “dents”

This roof, completed by my company: Patina Slate & Copper, was destroyed by overzealous “hail damage” sales tactics, and ignorance. Only a few years after installation: in spite of being perfectly sound. The contractor who ended up doing the work sought me out to get up training on standing seam, however it was much after this roof. Truly a crime.

hip patterns series 4:12 and 6:12

Over my time in the shelter from November, thru the beginning of February, I worked on these hip patters. These are useful for creating folded hips on a standing seam copper roof, although any light gauge material that will not rust can be used. Eventually I will get them all scanned and available on an index page. One-off patterns are always available. Contact for metal roofing design and pattern work!

Print out the PDFs and align to the un-formed pan end.


Print out the PDFs and align to the un-formed pan end.


Print out the PDFs and align to the un-formed pan end.


Print out the PDFs and align to un-formed pan end

Learn to fold metal roofs!

In 2015 I left Rhode Island, and Casa Buena Builders to bring seamed roofing to the english-speaking world. I had been studying at night, bringing my skills up with folding and joinery; while working full-time in historic preservation, remodeling, and slate roofing. My favorite project of the tour that year was this seminar I was invited to give at the HPTC (Historic Preservation Training Center) headquarters in Frederick, MD.

Almost all of these techniques were completely foreign to the seasoned pros from the National Parks Service. I hope to one-day have all of these rules codified in English, and accepted at least internally within organizations like NPS. We may never be able to regulate the entire market like the better countries but within institutions and even preservation districts it is possible. I know all properties benefit from having roofs that are designed to last as long as the building.

This handout (PDF link) below demonstrates how to layout and cut the valley seam, from the ground as long as you know the two pitches of the intersection roof faces. This is very important with metal roof seaming. Much like in timber framing: the piece must be fully fabricated to exact specifications before they are assembled. In the same way: we do most of our design and layout on the drawing board, and on the cutting bench. There is very little “in place” fabrication, only folding assemblies.